本文最后更新于 2026年4月2日 上午
Memos 是一款非常轻量的自托管的备忘录中心。你可以把它当作个人笔记本、备忘录,多账号功能,使得我们也可以和小伙伴共同使用,当作专属朋友圈、微博。本次,我们使用 Docker 部署 Memos,实现一个轻量级的个人博客说说栏。
Memos 介绍
为什么使用 Memos 呢? 其实,我之前就比较喜欢用 Apple 的备忘录,但是这样有两个问题:
- 不方便分享: 如果我分享给小伙伴,那么通常是需要截屏分享。
- 设备端不够多: 我的 MacBook 和 iPhone 都可以使用备忘录,但是 Android 手机就不太方便。
Memos 的一个好处,就是支持多平台,比如移动端你可以用 MoeMemos(Android 或者 iOS),桌面端你可以用 Memos 自带的 Web:
而且,Memos 还支持多账号,这样我们就可以和小伙伴一起使用 Memos,共同维护一个 Memos 服务,实现一个轻量级的说说栏。
Memos API
其实我个人对于 Memos 是又爱又恨的:
一方面,它是开源的,使用的还是极其宽松的 MIT License。另一方面,它在轻量化的同时,又非常随意: 我平时用的 API 接口是 api/v1/memos,在我接触 Memos 的两年以来,升级过三次版本,每次的升级,我都需要重新修改和适配它的 API……
可能作者在最初构建 Memos 的时候,没有想到会有这么多人使用它,并没有设计好 Memos 的 API 形式;导致频繁出现破坏性变更。

旧版本 API
既然都说到 Memos 的 API 了,我们就来说一下旧版本和新版本的区别。我刚开始用 Memos 的时候,应该是 2023.12.19 版本,存在一个查看用户发送的动态内容的接口(不用鉴权,查看公开内容的接口)。
当时使用的 API 是 api/v1/memos,内容应该是:
1
| $memoshost/api/v1/memo?creatorId=$creatorId&rowStatus=NORMAL&limit=$limit&offset=$offset
|
其中:
$memoshost 是 Memos 的域名,比如 memos.mintimate.cn。$creatorId 是用户 ID,比如 1就是 memos 内的第一个用户。$limit 是返回的记录数,比如 10 就是返回 10 条记录。$offset 是偏移量,比如 20 就是从第 20 条记录开始返回,也就是分页。
如果你还需要标签过滤,那么在后面直接加上 &tagName=$tagName 即可。
具体可以看之前 木木木木木 大佬的文章: Memos API 非官方不完全说明
其实,这个接口就有点奇怪,为什么我们不直接使用 api/v1/memos 呢?果然,后续的版本,就变成了 api/v1/memos……
新版本 API
在后来的版本中,Memos 的 API 就变成了 api/v1/memos,好在后来有了 API 的文档:

也就是说,我们这个时候需要用 api/v1/memos 接口,来查看用户发送的动态内容。并且参数也进行了修改:
1
| $memoshost/api/v1/memos?creatorId=$creatorId&state=NORMAL&pageSize=$pageSize&pageToken=$pageToken
|
对比之下,我们发现,pageSize 和 pageToken 参数,是用来分页的,取代原本的 limit 和 offset 参数;同时,state 参数,是用来过滤状态的,取代原本的 rowStatus 参数。
其实还有更多,比如标签的过滤,原本是 tagName,现在变成需要用 filter 过滤。
支持创作
制作教程不易,如果热心的小伙伴,想支持创作,可以加入我们的电圈(还可以解锁远程协助、好友位😃):
志同道合的小伙伴也是知音难觅。
-
开发者爱好群:
👉 如果你对云服务器、CDN、云数据库和Linux等云计算感兴趣,亦或者喜欢编程、设计、产品、运营等领域,欢迎加入我们的开发者爱好群,一起交流学习(目前可能就我一个人?🤔,毕竟才刚刚创建~)。
当然,也欢迎在B站、YouTube或微信公众号上关注我们:
更多:
如果你也想使用腾讯云的轻量应用服务器部署 Memos;那么你可以使用博客的专属链接购买体验:
Memos 部署
我们已经讲完 Memos 最大的“坑”,也就就是它的 API 可能在升级后都需要重新适配。接下来,我们就来讲讲如何部署 Memos。部署就非常简单了,我们提前部署 Docker,之后创建 Docker Compose 文件来映射端口和目录,然后运行即可:
flowchart LR
    Start(("服务器安装 Docker")) --> Method{部署方式}

    Method --> |首次部署| A[1. 创建 docker-compose.yml]
    A --> B[2. 启动: docker-compose up -d]

    Method --> |版本升级| C[1. 更新: docker-compose pull]
    C --> D[2. 重启: docker-compose up -d]

    B --> Success(("✅ 服务运行"))
    D --> Success
    style Start fill:#555,stroke:#fff,color:white
    style Success fill:#555,stroke:#fff,color:white
    style Method fill:#7e57c2,stroke:#fff,color:white,stroke-width:2px

    style A fill:#e1f5fe,stroke:#039be5
    style B fill:#bbdefb,stroke:#1976d2
    style C fill:#e8f5e9,stroke#388e3c
    style D fill:#c8e6c9,stroke:#2e7d32
当然,既然需要部署,那么肯定需要一台服务器。服务器的初始化和购买我就跳过了。
准备 Docker
我们需要提前安装好 Docker-ce,这里我们使用 Docker 官方提供的 Docker 安装文档,按照步骤安装即可。
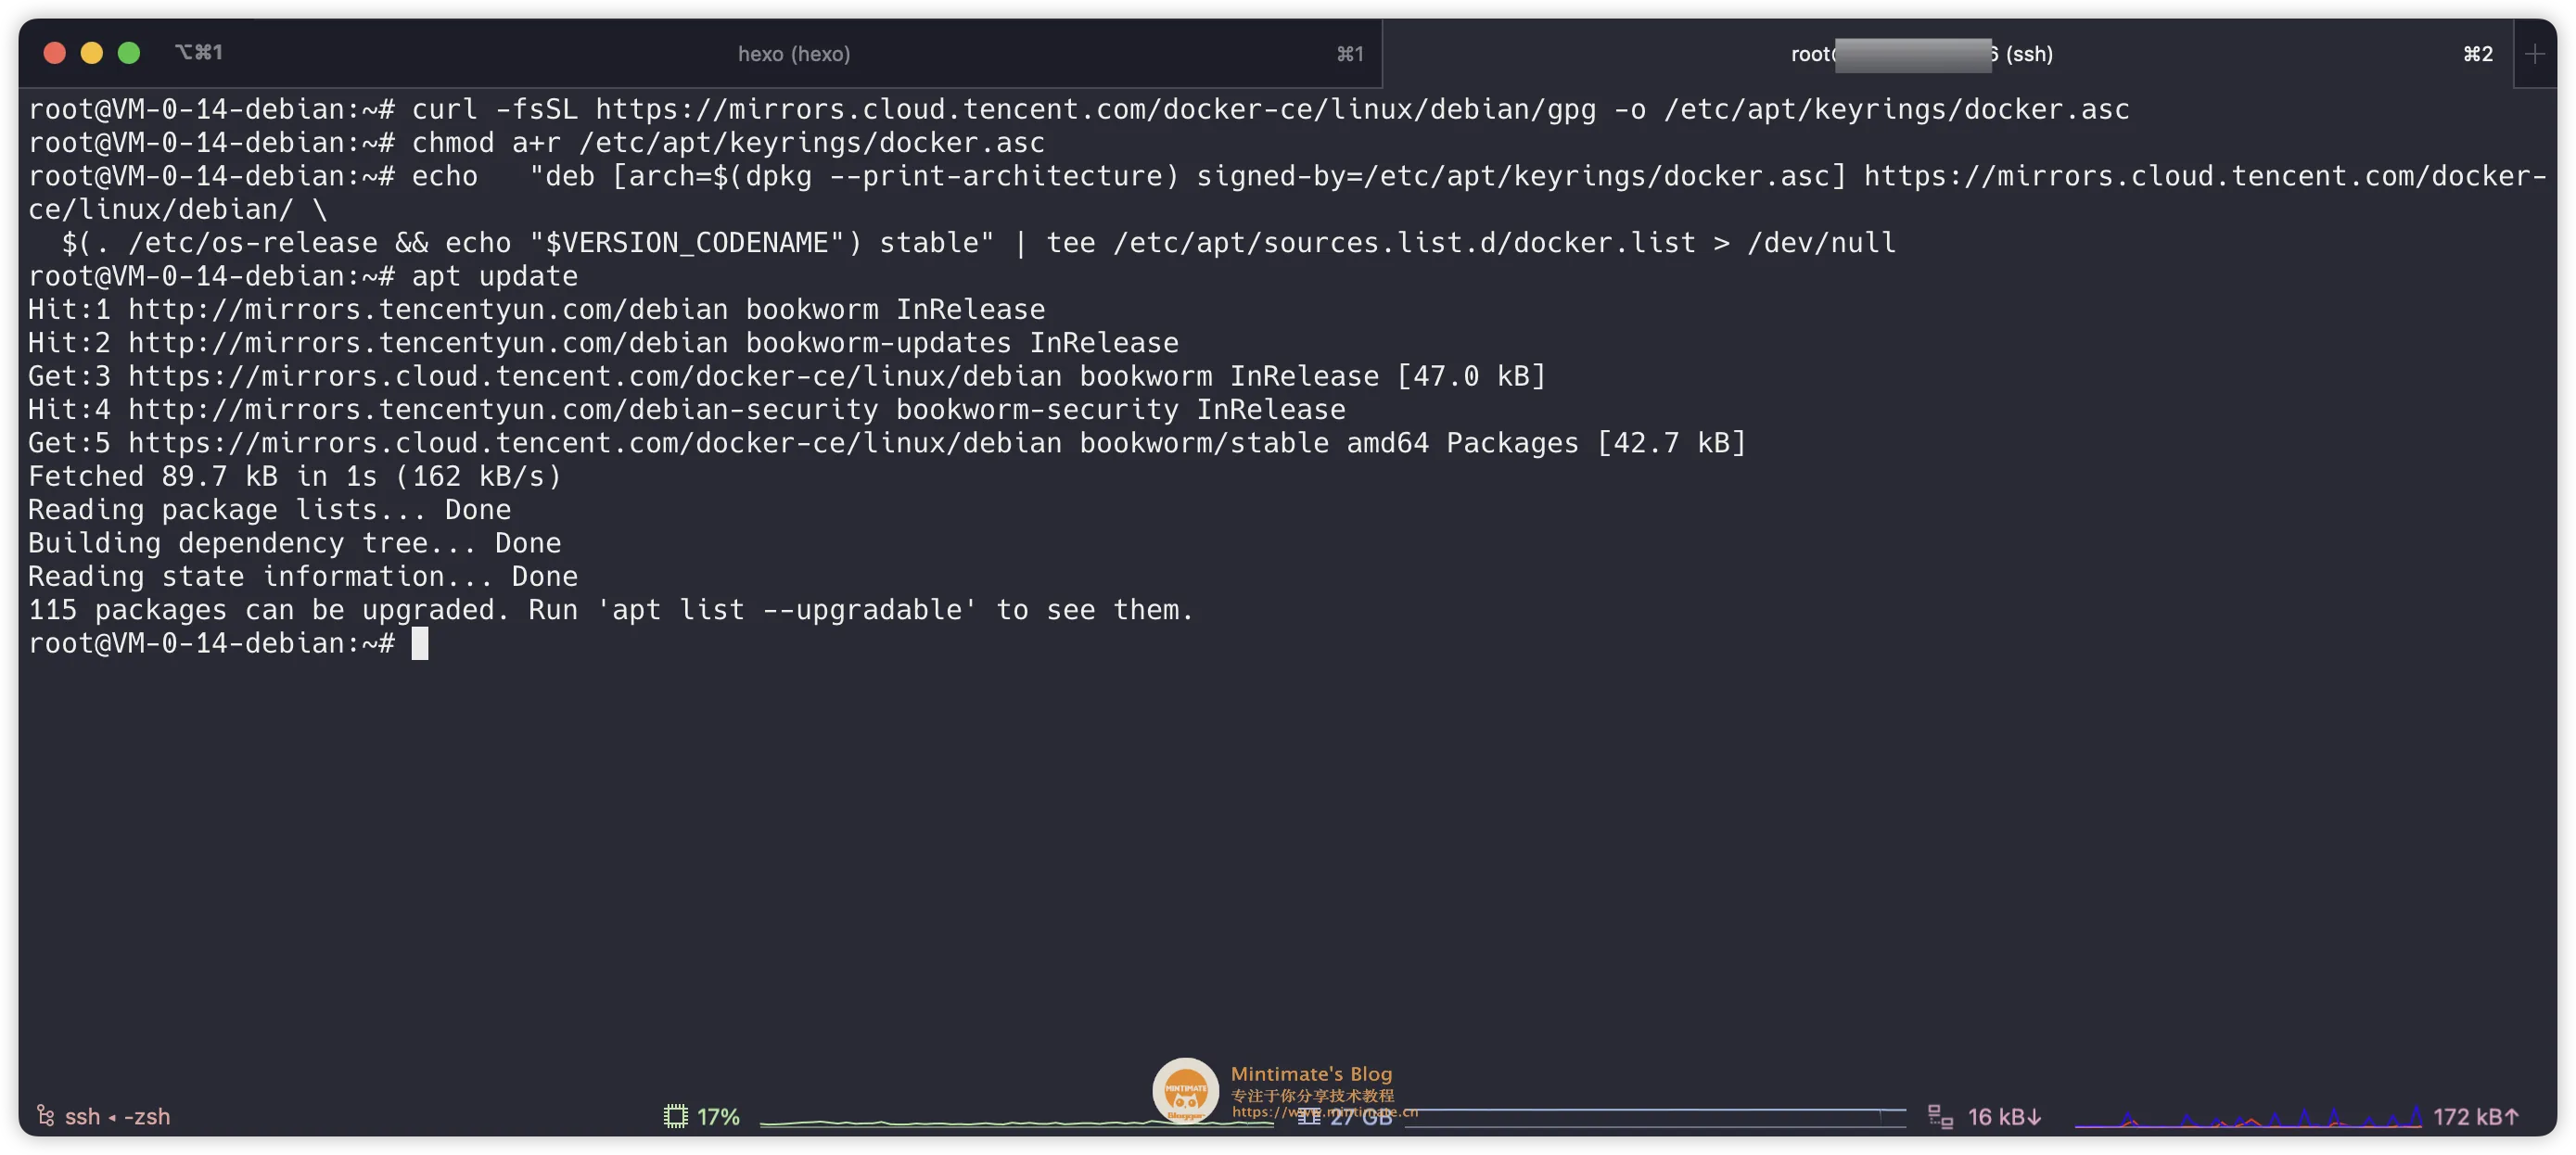
不过,和 GitHub 一样,国内连接 Docker Hub 非常慢,如果你是国内服务器,那么你可以用云厂商的 Docker-ce 镜像源并替换 Docker hub 源为云厂商的镜像源:
以腾讯云为例,我们使用腾讯云的 Debian 镜像,添加 Docker-ce 镜像:
1
2
3
4
5
6
7
8
9
10
11
12
13
|
apt update && apt install ca-certificates curl -y
install -m 0755 -d /etc/apt/keyrings
curl -fsSL https://mirrors.cloud.tencent.com/docker-ce/linux/debian/gpg -o /etc/apt/keyrings/docker.asc
chmod a+r /etc/apt/keyrings/docker.asc
echo "deb [arch=$(dpkg --print-architecture) signed-by=/etc/apt/keyrings/docker.asc] https://mirrors.cloud.tencent.com/docker-ce/linux/debian/ \
$(. /etc/os-release && echo "$VERSION_CODENAME") stable" | tee /etc/apt/sources.list.d/docker.list > /dev/null
apt update
|
之后用软件包管理器安装 Docker-ce 即可:
1
| apt install docker-ce docker-ce-cli containerd.io docker-buildx-plugin docker-compose-plugin
|
安装完成后,我们就可以使用 Docker 命令了:
1
2
| docker --version
docker compose version
|

Memos 镜像
Memos 的镜像,同时在 GitHub 和 Docker Hub 上都有,我个人更建议使用 Docker Hub 上的镜像,因为云厂商的镜像源,都有提供内网版本的 Docker Hub 镜像源,可以加速下载。
Memos 的 Docker Hub 镜像地址是: https://hub.docker.com/r/usememos/memos,我们只需要拉取镜像即可:
1
2
|
docker pull usememos/memos
|
当然,最后直接用 docker compose 启动,更加方便:
1
2
3
4
5
6
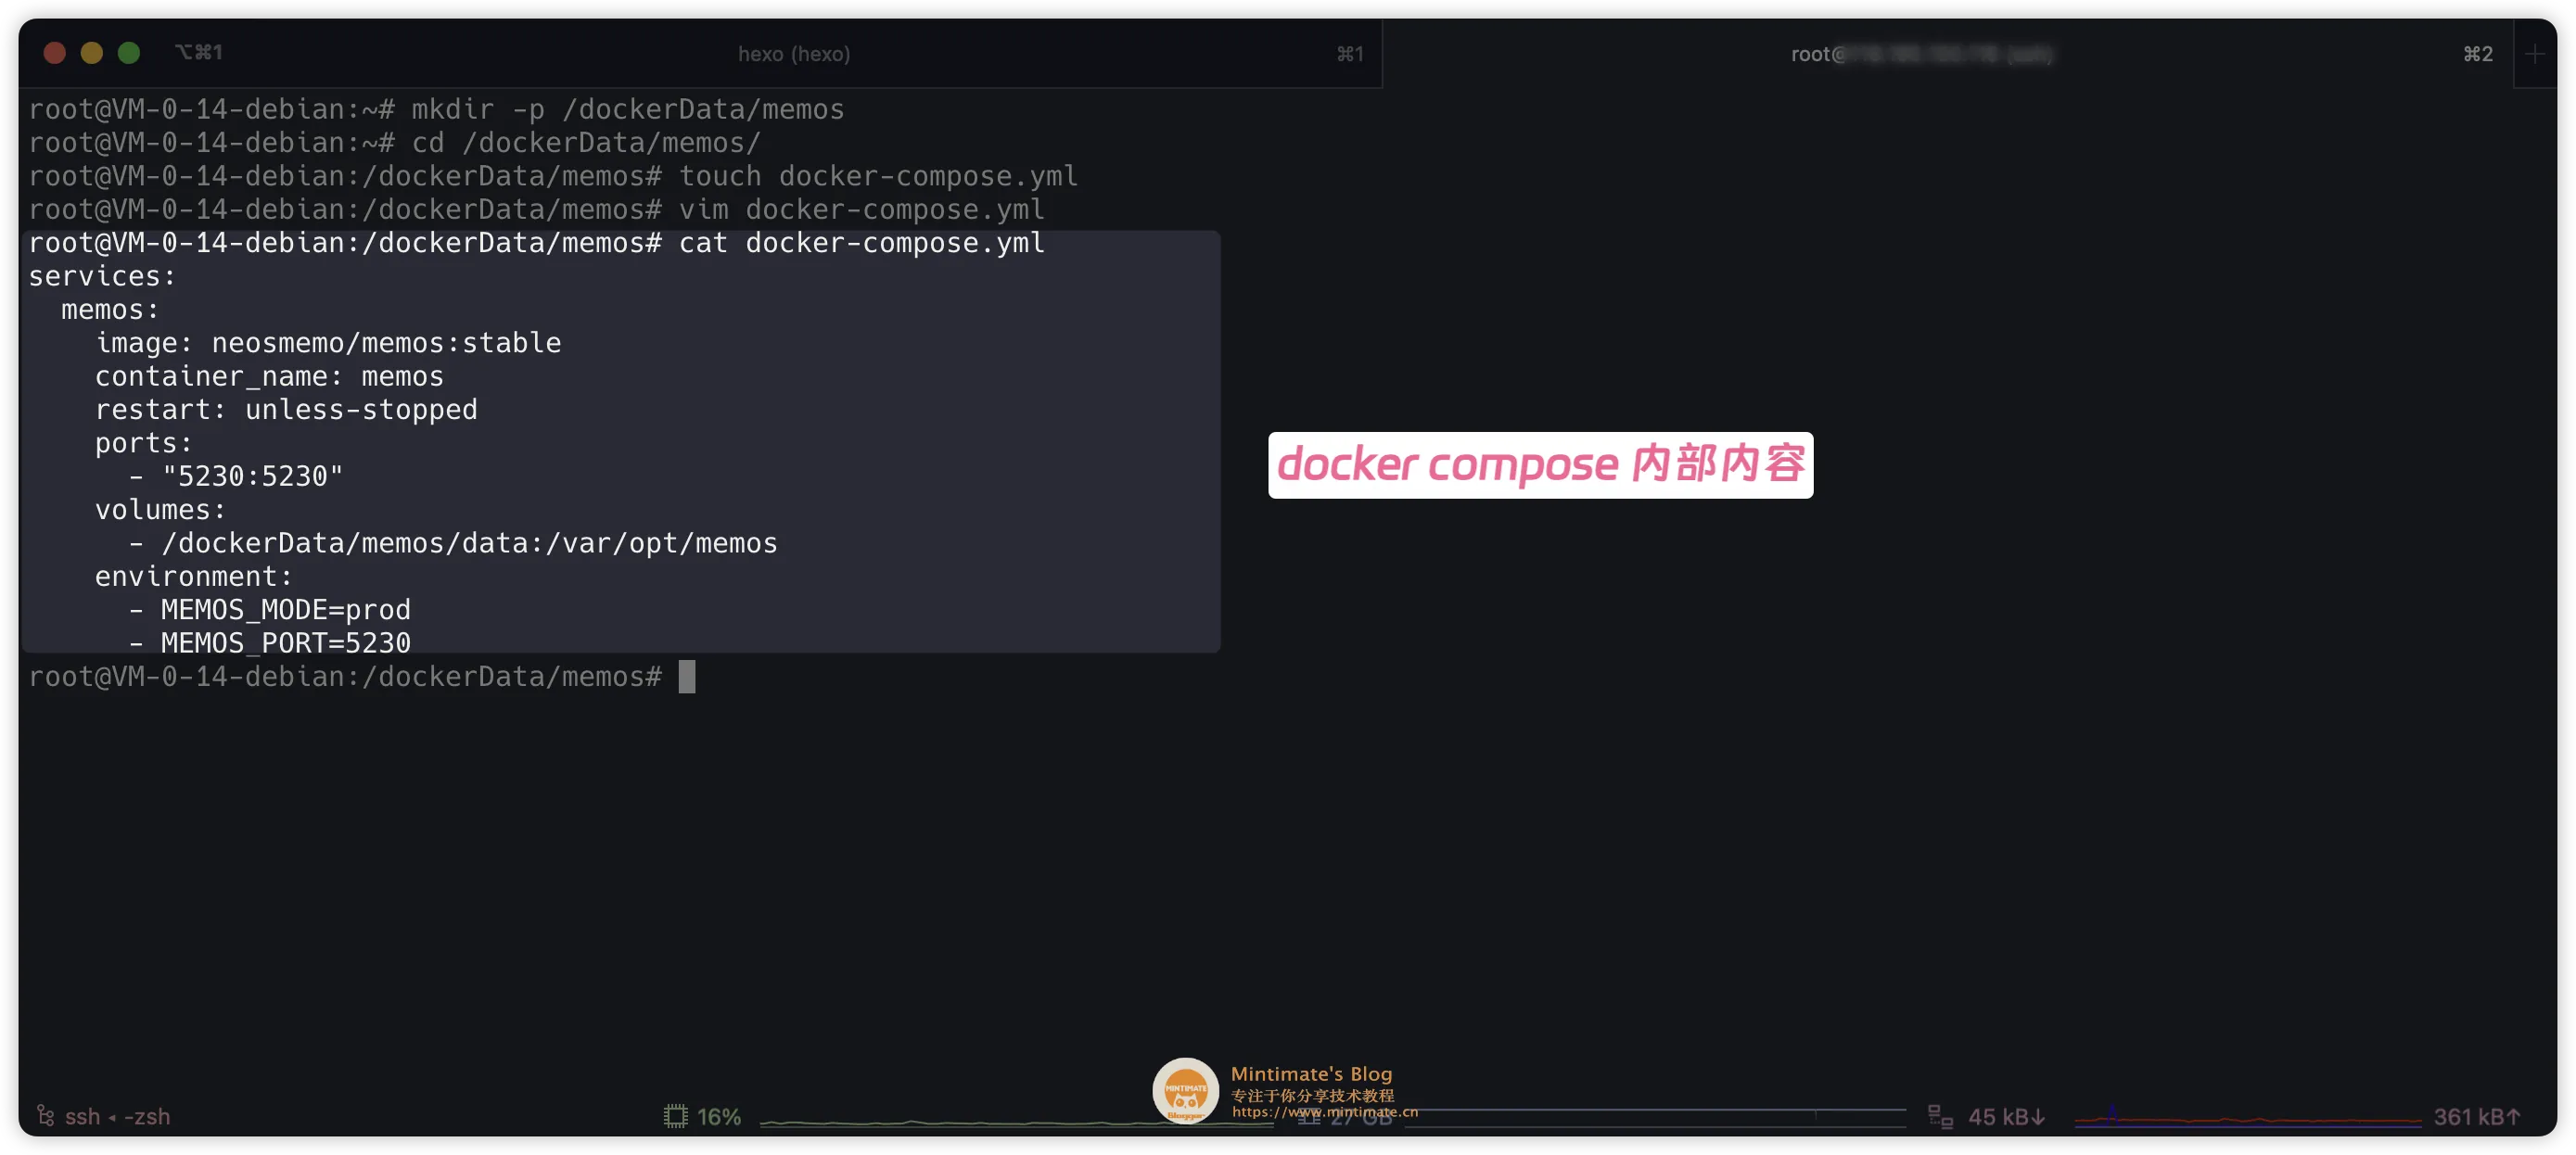
|
mkdir -p /dockerData/memos
cd /dockerData/memos
touch docker-compose.yml
|
我的 docker-compose.yml 文件如下:
1
2
3
4
5
6
7
8
9
10
11
12
| services:
memos:
image: neosmemo/memos:stable
container_name: memos
restart: unless-stopped
ports:
- "5230:5230"
volumes:
- /dockerData/memos/data:/var/opt/memos
environment:
- MEMOS_MODE=prod
- MEMOS_PORT=5230
|
之后,我们就可以启动 Memos 了:
1
2
3
4
|
docker compose pull
docker compose up -d
|
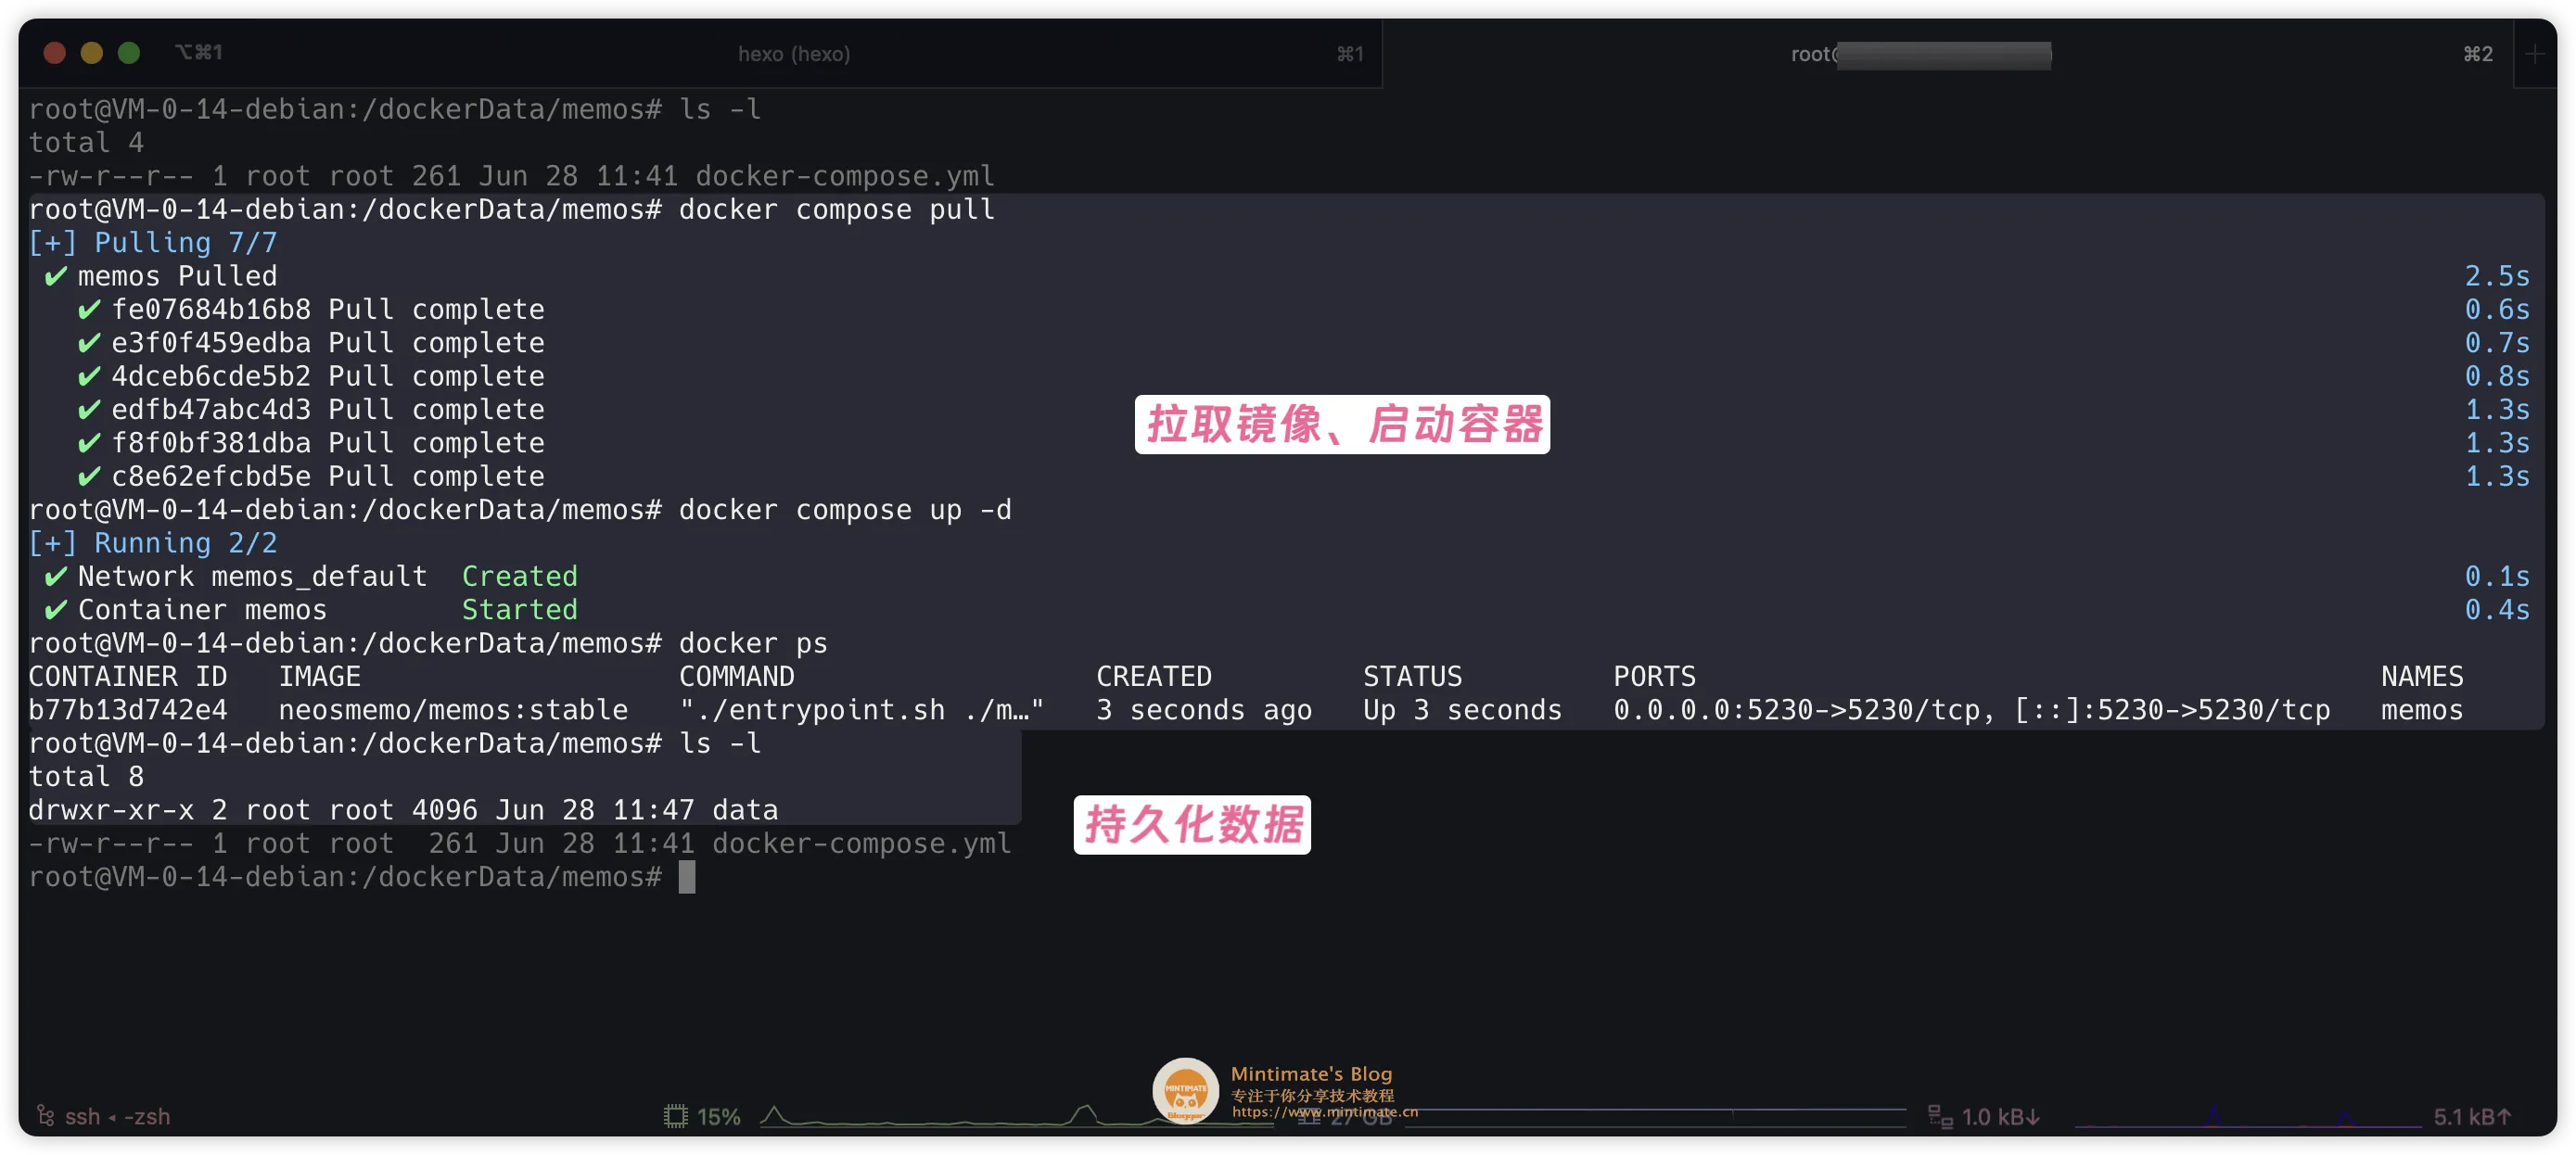
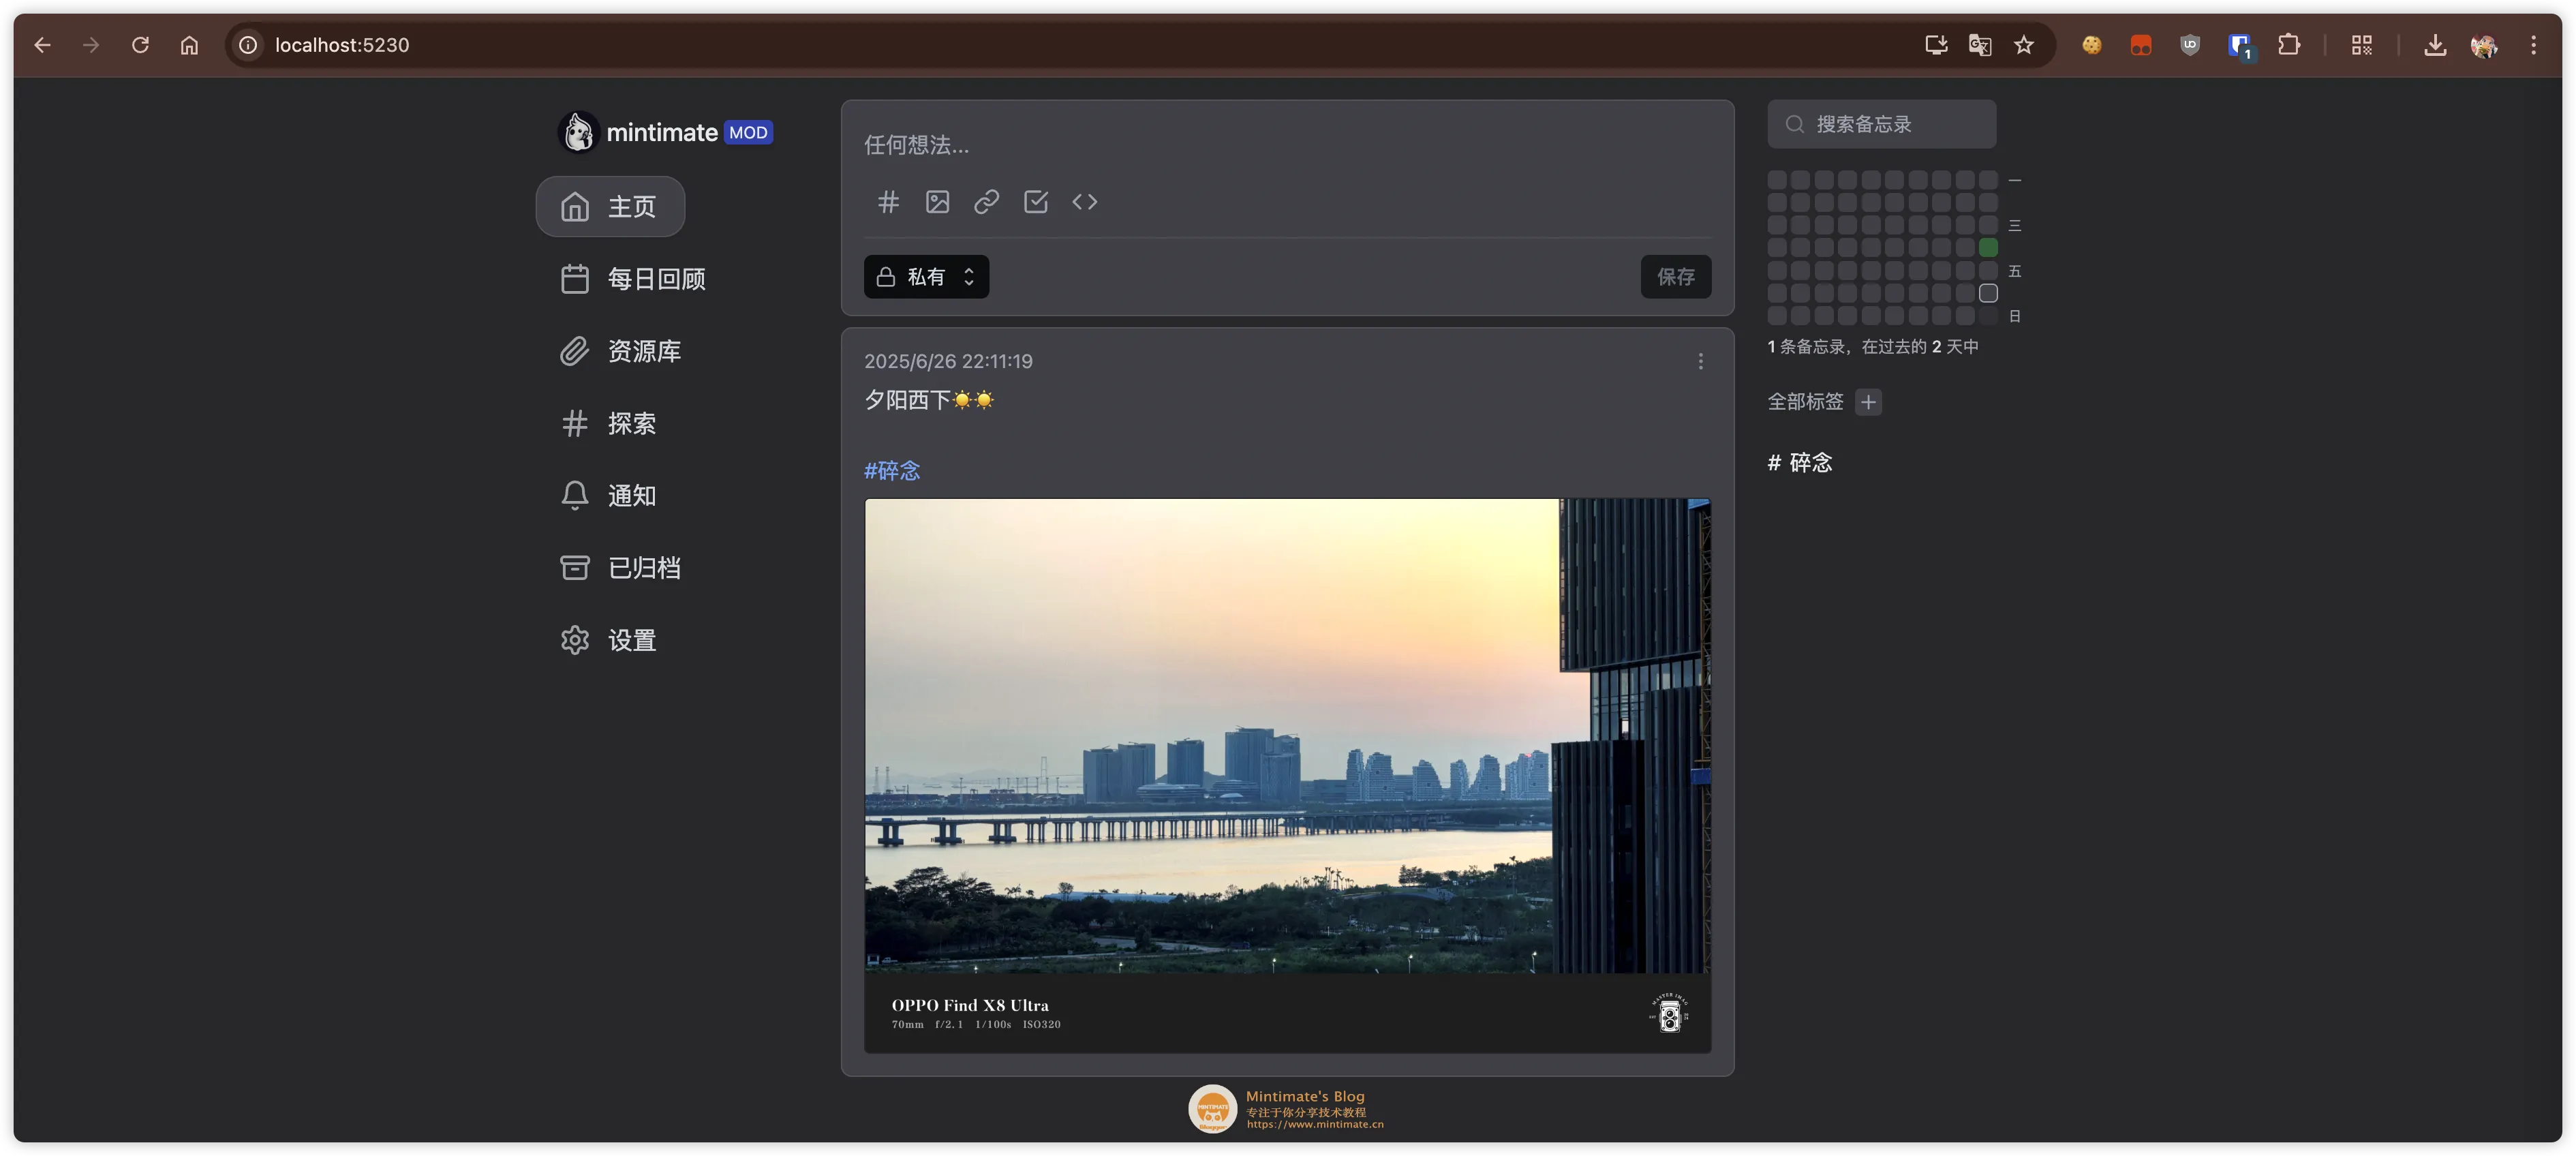
到此,Memos 就部署完成了。你可以使用浏览器访问 5230 端口,即可看到 Memos 的登录页面。
简单注册账号后,发个说说:
Nginx 反代
Memos 默认的端口是 5230,如果你想使用 80 端口,那么你可以使用 Nginx 反代,具体配置如下:
1
2
3
4
5
6
7
| location / {
proxy_set_header Host $host;
proxy_set_header X-Real-IP $remote_addr;
proxy_set_header REMOTE-HOST $remote_addr;
proxy_set_header X-Forwarded-For $proxy_add_x_forwarded_for;
proxy_pass http://127.0.0.1:5230;
}
|
融入 Hexo
前文提到,我们搭建好的 Memos,提供好了 API,那么我们可以写一个 JavaScript 脚本,将 Memos 的 API 融入到 Hexo 博客中。
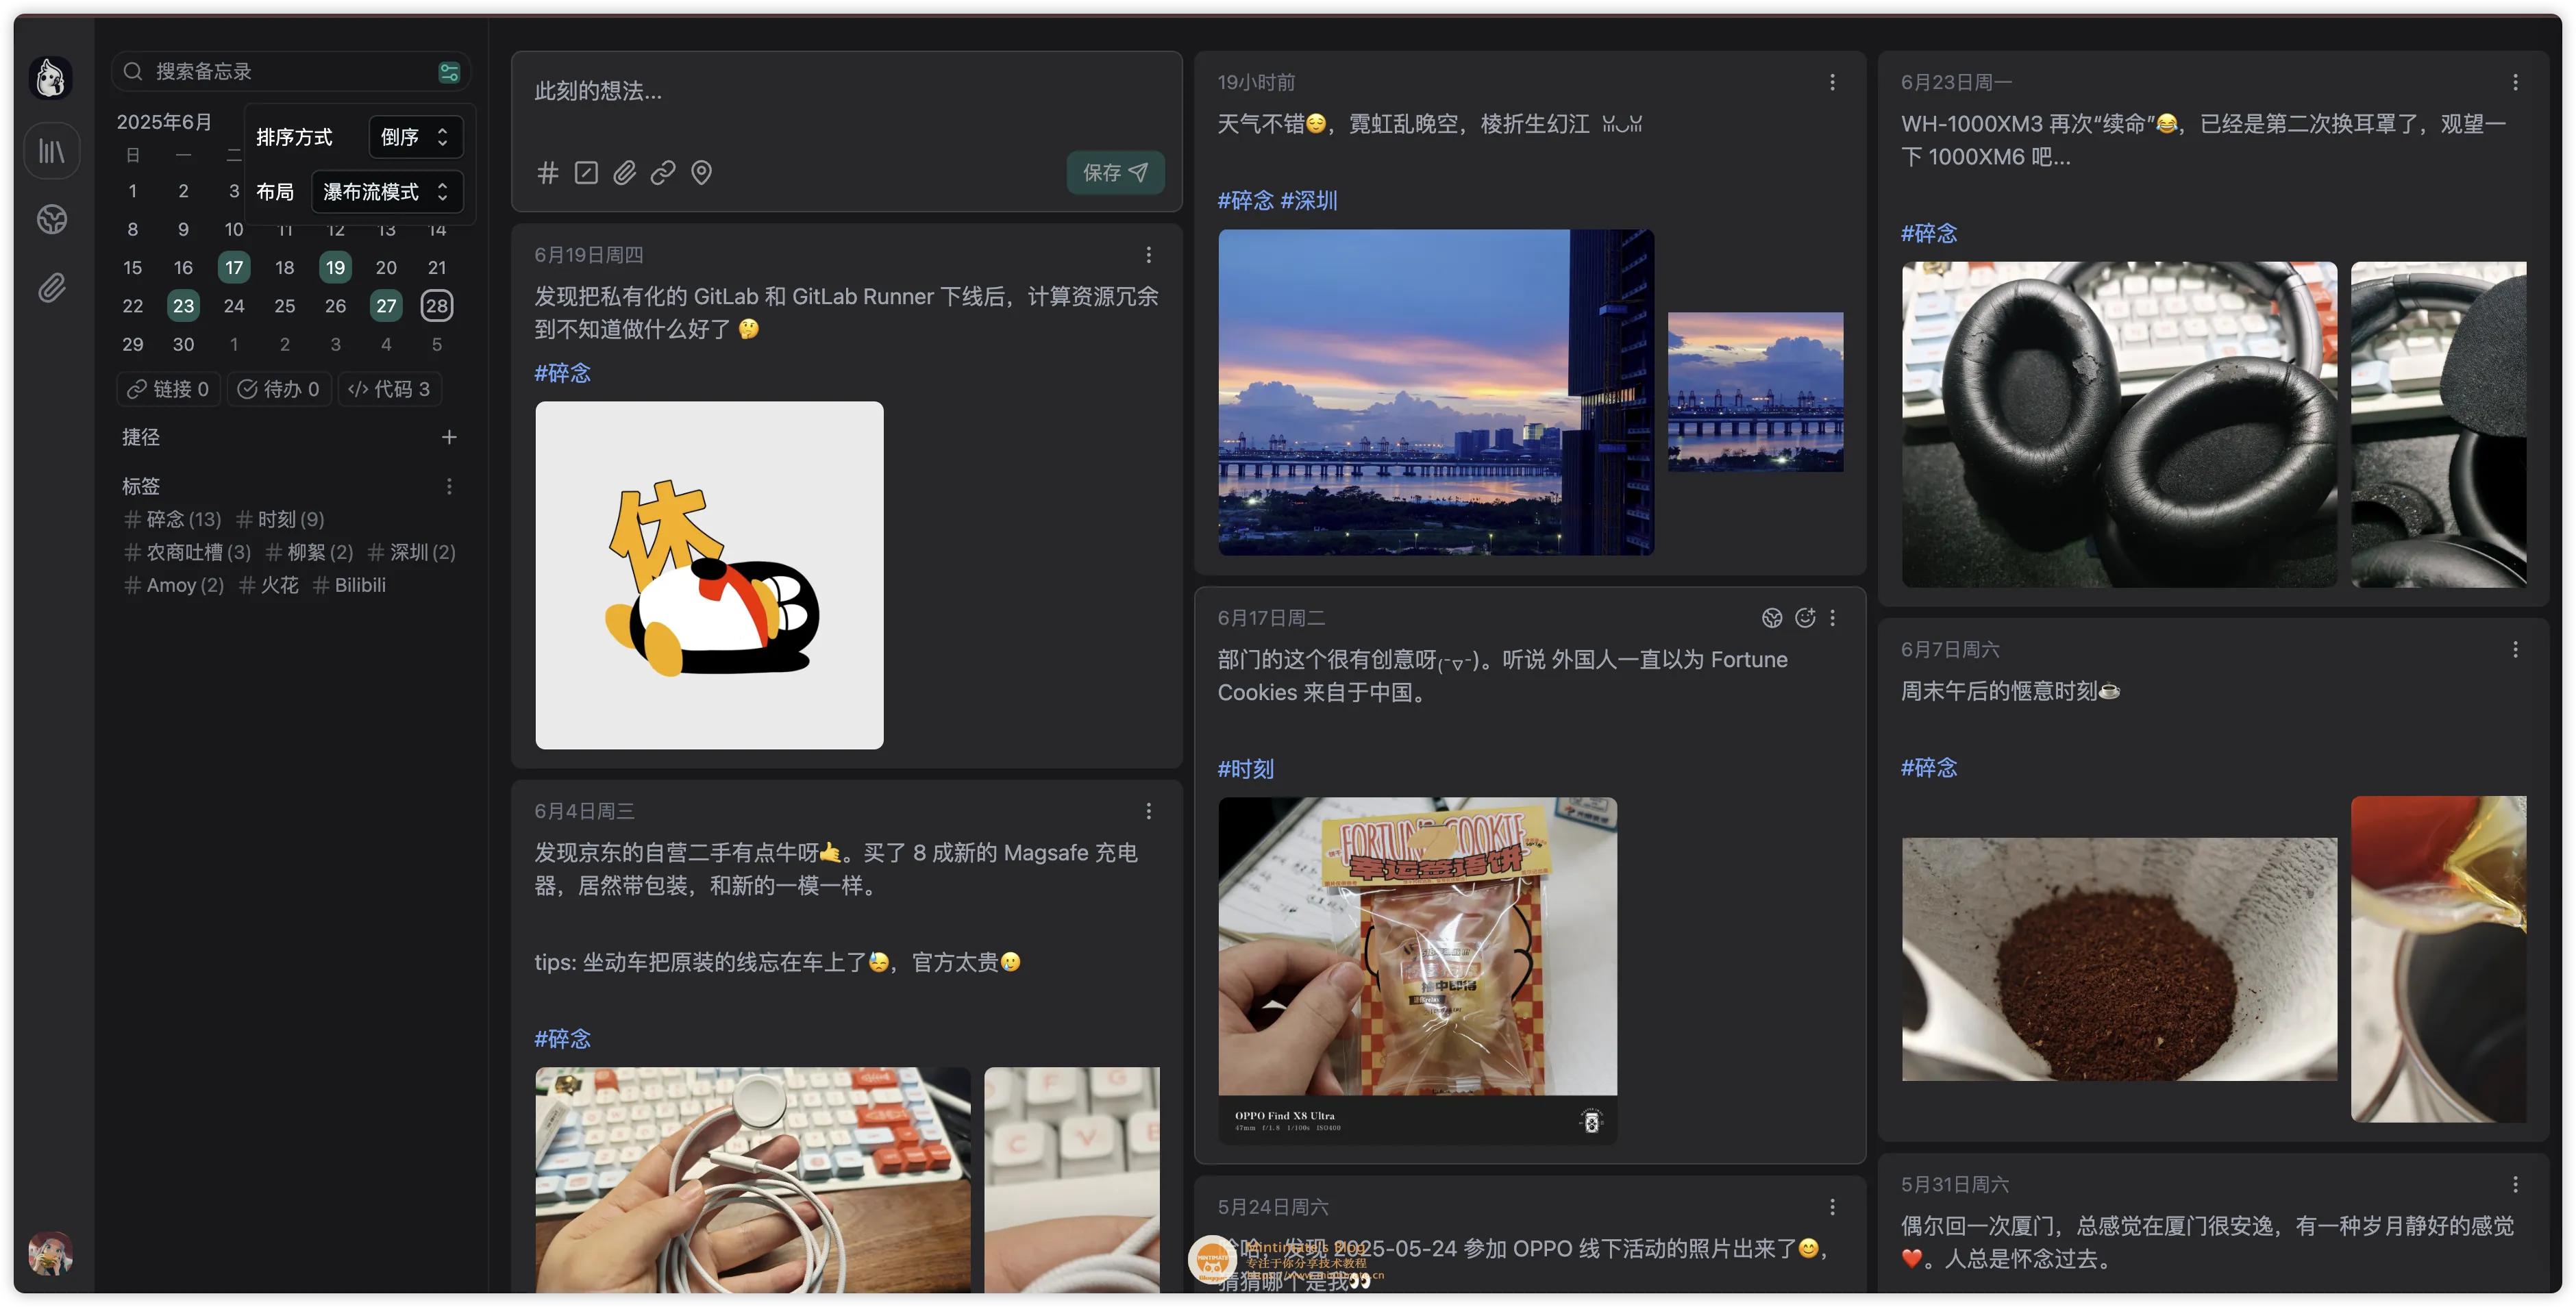
最后的效果:
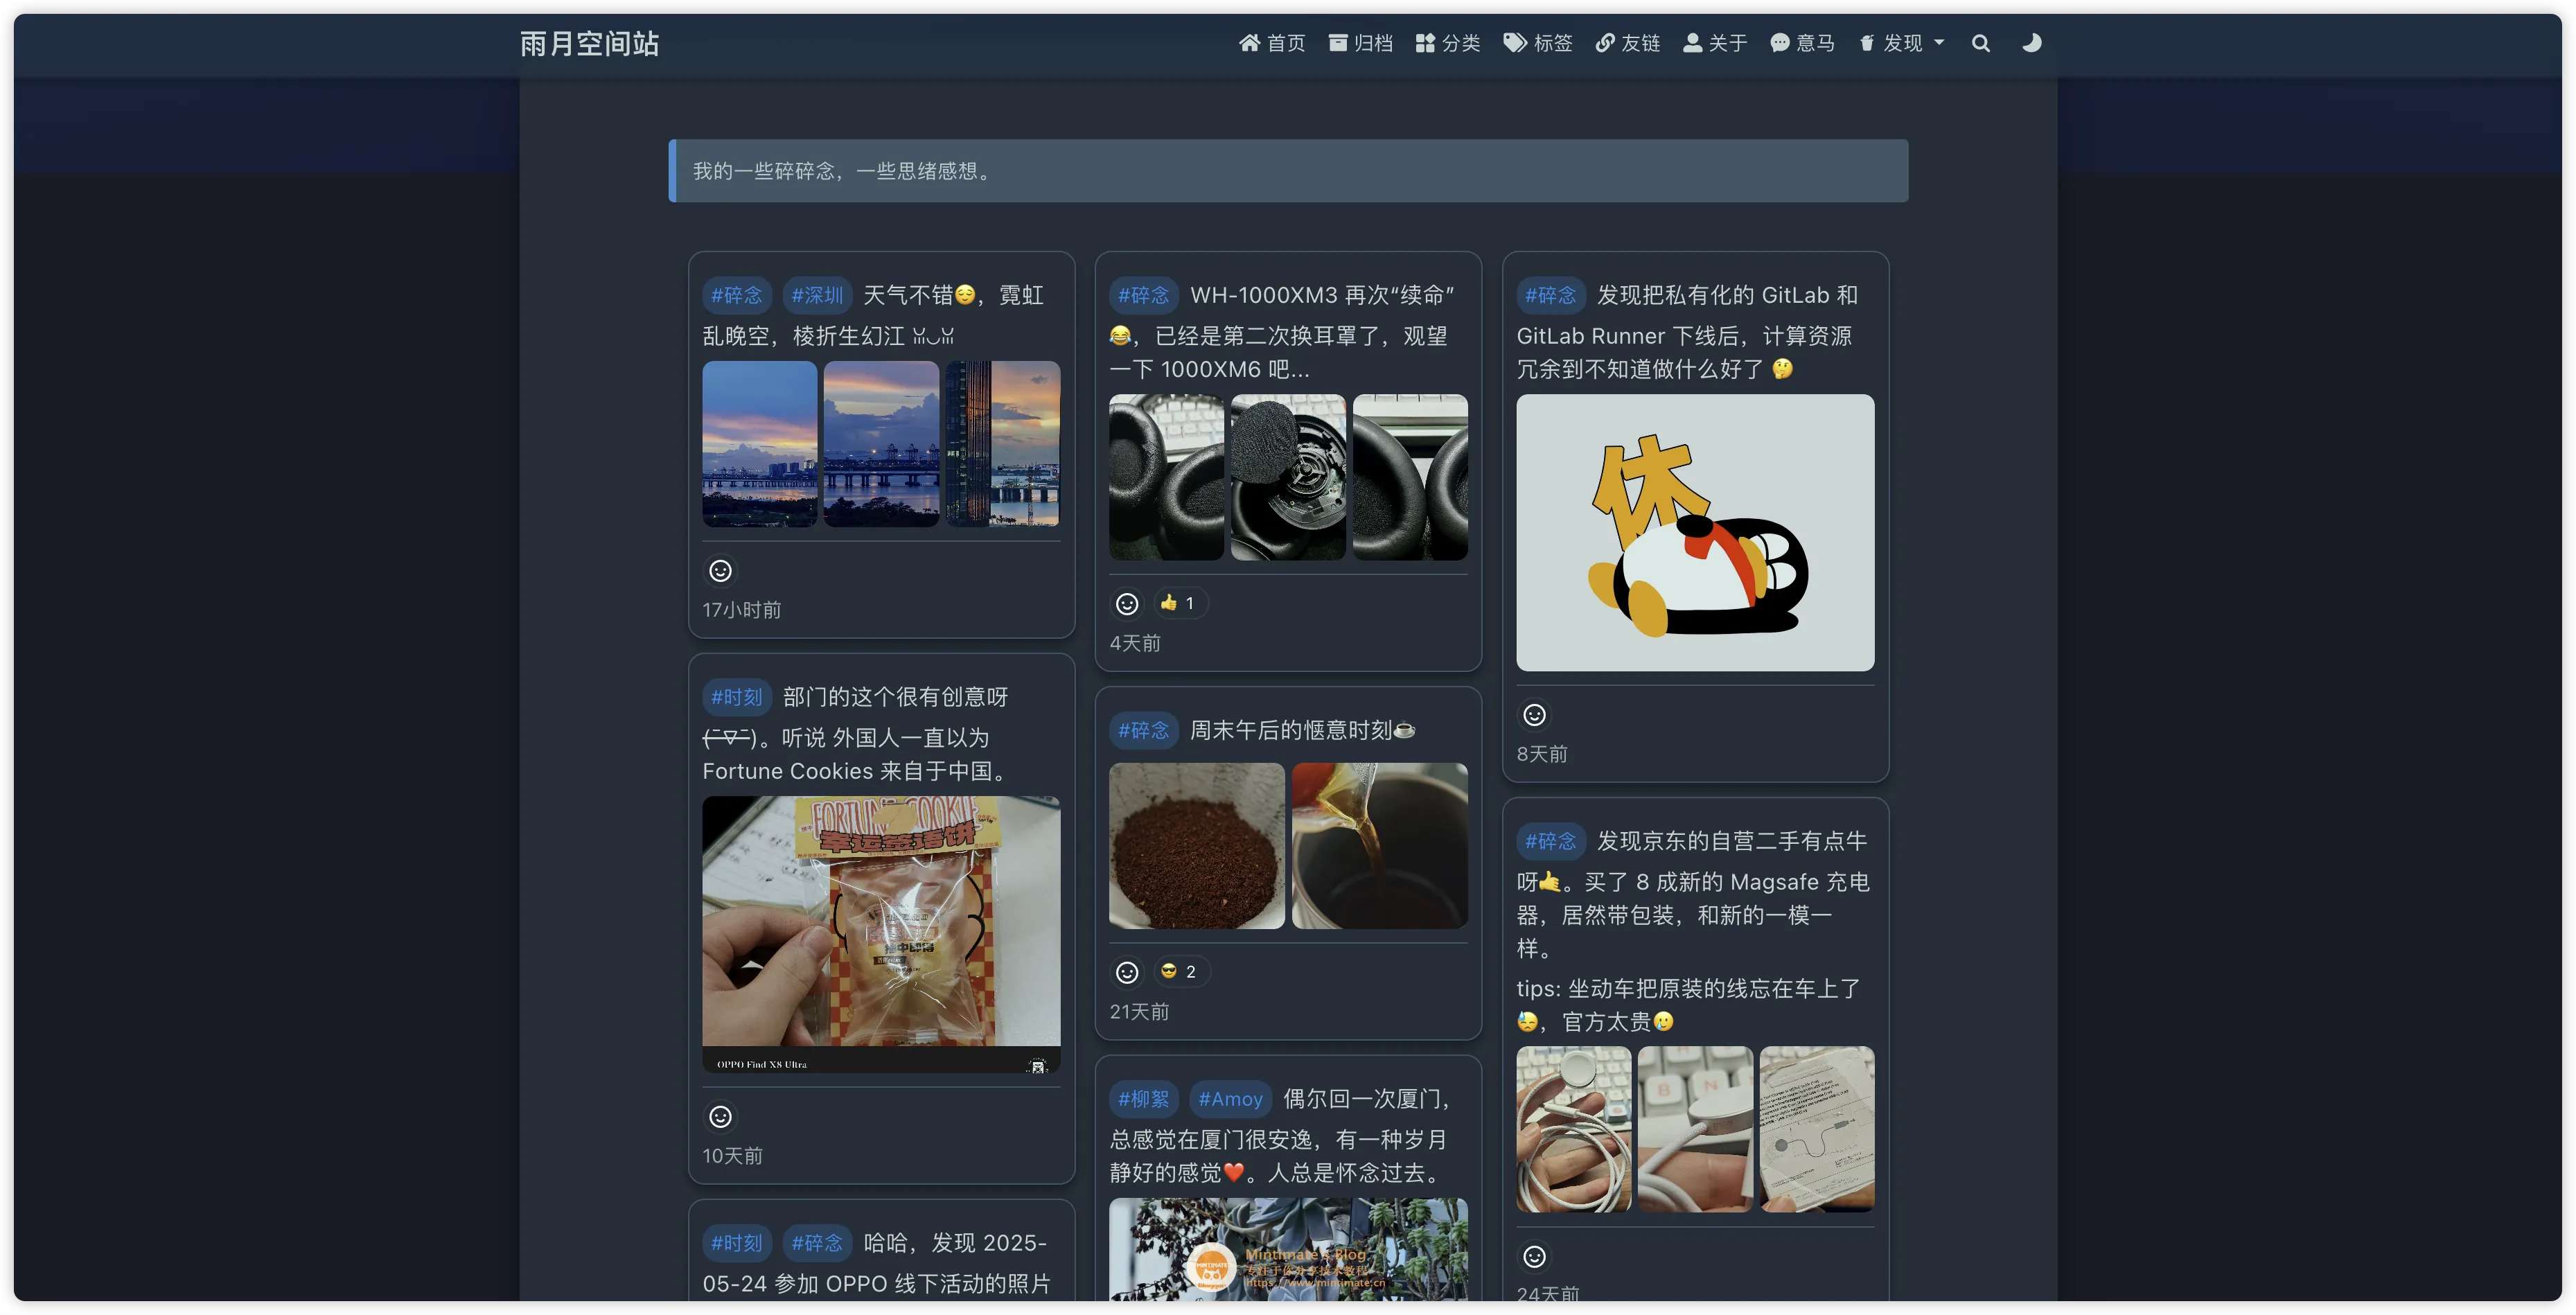
具体效果可以看我的博客: https://www.mintimate.cn/Memos/。
本质就需要做两件事:
- 通过 Memos 的 API 获取说说列表;
- 使用瀑布流布局,将说说列表渲染到页面上。
发现 木木木木木 大佬已经适配过一次;但是后来 Memos 频繁更新,导致适配失败,所以这里我重新适配了一下:
适配思路很简单,就是通过 Memos 的 API 获取说说列表,然后使用瀑布流布局,将说说列表渲染到页面上。
关键源代码
首先是获取说说列表,这里我封装了一个函数,直接调用即可:
1
2
3
4
5
6
7
8
9
10
11
12
13
14
15
16
17
18
19
20
21
22
23
24
25
26
27
28
29
30
31
32
| async function getFirstList(apiV1){
try {
AppState.bbDom.insertAdjacentHTML('afterend', load);
bindLoadMoreButton(apiV1);
let bbUrl = AppState.memos+"api/"+apiV1+"memos?creatorId="+bbMemo.creatorId+"&filter=creator_id == 1&pageSize="+AppState.limit;
const response = await fetch(bbUrl);
if (!response.ok) {
throw new Error(`HTTP error! status: ${response.status}`);
}
const resdata = await response.json();
updateHTMl(resdata)
AppState.offset = resdata.nextPageToken
if (AppState.offset === '' || !resdata.memos || resdata.memos.length === 0){
const loadBtn = document.querySelector("button.button-load");
loadBtn.textContent = '没有更多了';
loadBtn.disabled = true;
return
}
AppState.mePage++
getNextList(apiV1)
} catch (error) {
console.error('获取数据失败:', error);
AppState.bbDom.innerHTML = '<div class="error">加载失败,请刷新页面重试</div>';
}
}
|
同时,为了加载更快,我们同时加载下一页的数据:
1
2
3
4
5
6
7
8
9
10
11
12
13
14
15
16
17
18
19
20
21
22
23
24
25
26
27
28
29
30
31
32
33
34
35
36
37
| async function getNextList(apiV1){
try {
if (AppState.isLoading) return;
if (AppState.offset === '') {
const loadBtn = document.querySelector("button.button-load");
loadBtn.textContent = '没有更多了';
loadBtn.disabled = true;
return;
}
AppState.isLoading = true;
let bbUrl = AppState.memos+"api/"+apiV1+"memos?creatorId="+bbMemo.creatorId+"&pageSize="+AppState.limit+"&pageToken="+AppState.offset;
if (AppState.tageFilter){
bbUrl = bbUrl + '&filter=tag in ["' + AppState.tageFilter + '"]';
}
const response = await fetch(bbUrl);
if (!response.ok) {
throw new Error(`HTTP error! status: ${response.status}`);
}
const resdata = await response.json();
AppState.nextDom = resdata
AppState.mePage++
AppState.offset = resdata.nextPageToken
} catch (error) {
console.error('预加载下一页失败:', error);
} finally {
AppState.isLoading = false;
}
}
|
最后,就是渲染到页面上,这里我使用了瀑布流布局,具体代码如下:
1
2
3
4
5
6
7
8
9
10
11
12
13
14
15
16
17
18
19
20
21
22
23
24
25
26
27
28
29
30
31
32
33
34
35
36
37
38
39
40
41
42
43
44
45
46
47
48
49
50
51
52
53
54
55
56
57
58
59
60
61
62
63
64
65
66
67
68
69
70
71
72
73
74
75
76
77
78
79
80
81
82
83
84
85
86
87
88
89
90
91
92
93
94
95
96
97
98
99
100
101
102
103
104
105
106
107
108
109
110
111
112
113
114
115
116
117
118
119
120
121
122
123
124
125
126
127
128
| function initWaterfallLayout(onlyNewItems = false) {
const container = document.querySelector('.bb-timeline');
if (!container) return;
const items = container.querySelectorAll('.memo-item');
if (items.length === 0) return;
const containerWidth = container.clientWidth;
const screenWidth = window.innerWidth;
let itemWidth, gap, columns;
if (screenWidth < 997) {
let horizontalMargin;
if (screenWidth < 480) {
horizontalMargin = 5;
} else {
horizontalMargin = 10;
}
itemWidth = containerWidth - horizontalMargin;
gap = 5;
columns = 1;
if (itemWidth < 200) {
itemWidth = 200;
}
items.forEach(item => {
item.style.width = itemWidth + 'px';
});
} else {
itemWidth = 280;
gap = 6;
columns = Math.floor(containerWidth / (itemWidth + gap));
if (columns > 4) {
columns = 4;
}
if (columns < 1) {
columns = 1;
}
items.forEach(item => {
item.style.width = itemWidth + 'px';
});
}
const actualGap = columns === 1 ? gap : (containerWidth - columns * itemWidth) / (columns + 1);
let columnHeights = new Array(columns).fill(actualGap * 0.5);
if (onlyNewItems) {
const existingItems = Array.from(items).filter(item => item.style.opacity !== '0' && item.style.opacity !== '');
if (existingItems.length > 0) {
columnHeights = new Array(columns).fill(0);
existingItems.forEach(item => {
const left = parseInt(item.style.left);
const top = parseInt(item.style.top);
if (columns === 1) {
const bottom = top + item.offsetHeight;
columnHeights[0] = Math.max(columnHeights[0], bottom);
} else {
const columnIndex = Math.round(left / (itemWidth + actualGap));
const bottom = top + item.offsetHeight;
if (columnIndex >= 0 && columnIndex < columns) {
columnHeights[columnIndex] = Math.max(columnHeights[columnIndex], bottom);
}
}
});
}
}
const itemsToProcess = onlyNewItems ?
Array.from(items).filter(item => item.style.opacity === '0' || item.style.opacity === '') :
Array.from(items);
itemsToProcess.forEach((item) => {
if (item.offsetHeight === 0) {
item.style.display = 'none';
item.offsetHeight;
item.style.display = '';
}
let left, top, columnIndex;
if (columns === 1) {
left = (containerWidth - itemWidth) / 2;
top = columnHeights[0] + gap;
columnIndex = 0;
} else {
const minHeight = Math.min(...columnHeights);
columnIndex = columnHeights.indexOf(minHeight);
left = actualGap + columnIndex * (itemWidth + actualGap);
top = minHeight + 4;
}
item.style.left = left + 'px';
item.style.top = top + 'px';
item.style.opacity = '1';
columnHeights[columnIndex] = top + item.offsetHeight + gap;
});
const maxHeight = Math.max(...columnHeights);
container.style.height = (maxHeight + gap) + 'px';
}
|
当然,具体的代码比较复杂,这里就不贴了,感兴趣的可以自己看源码。接下来我们看看如何使用。
使用方法
使用就非常简单了,其实就是自定义一个 Hexo 页面,然后把代码贴进去,最后在主题的配置文件中开启即可。
下载源代码后,你可以得到的文件结构如下:
1
2
3
4
5
6
7
8
9
10
11
| .
├── LICENSE
├── README.md
└── source
└── Memos
├── bb-lmm-mk.js
├── emaction.js
├── index.md
├── lately.min.js
├── marked.min.js
└── view-image.min.js
|
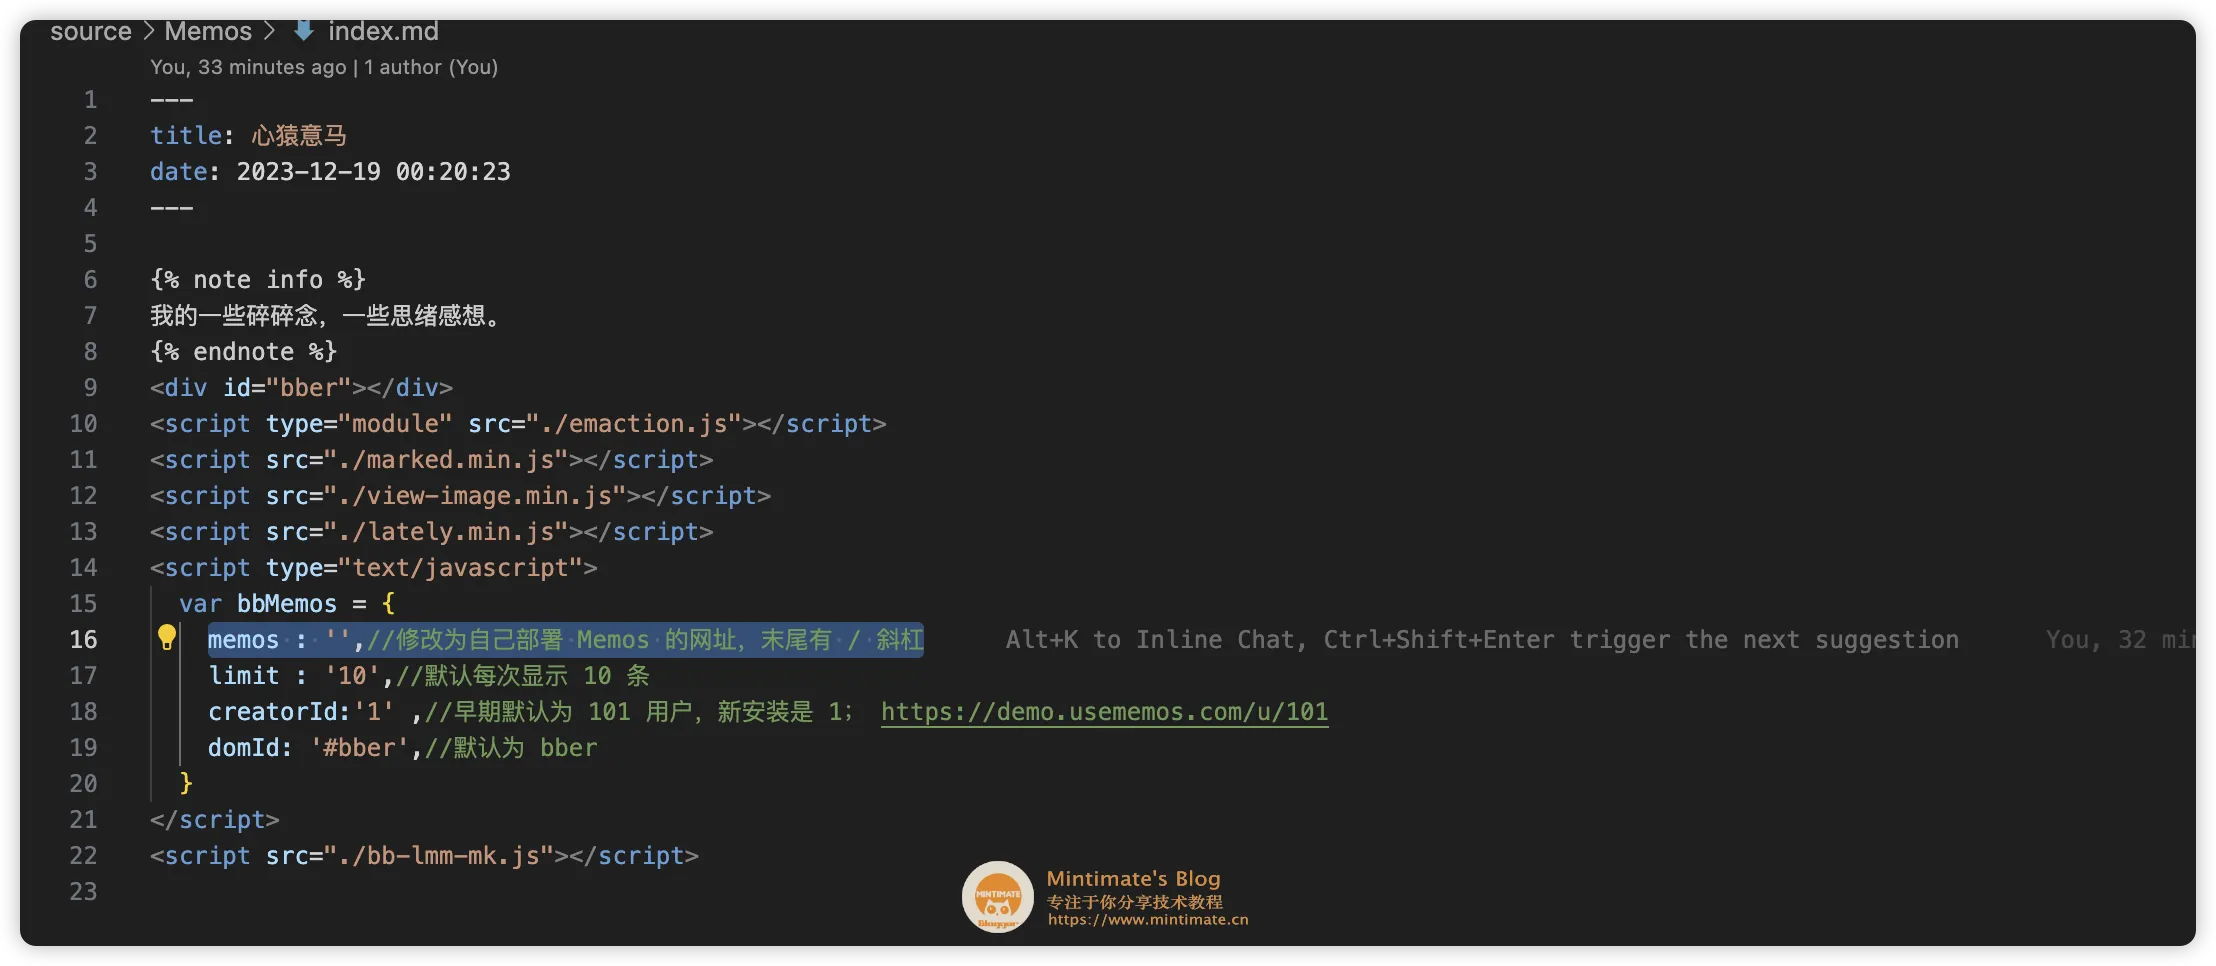
修改 source/Memos/index.md 文件,替换其中的 memos 地址为你的 Memos 地址并保存:
将 source/Memos 文件夹复制到你的 Hexo 博客的 source 文件夹下,然后在主题的配置文件中添加如下配置:
1
2
3
4
5
6
7
8
| menu:
- { key: "home", link: "/", icon: "iconfont icon-home-fill" }
- { key: "archive", link: "/archives/", icon: "iconfont icon-archive-fill" }
- { key: "category", link: "/categories/", icon: "iconfont icon-category-fill" }
- { key: "tag", link: "/tags/", icon: "iconfont icon-tags-fill" }
- { key: "links", link: "/links/", icon: "iconfont icon-link-fill" }
- { key: "about", link: "/about/", icon: "iconfont icon-user-fill" }
- { key: "Memos", link: "/Memos/", icon: "iconfont iconbg-chat" }
|
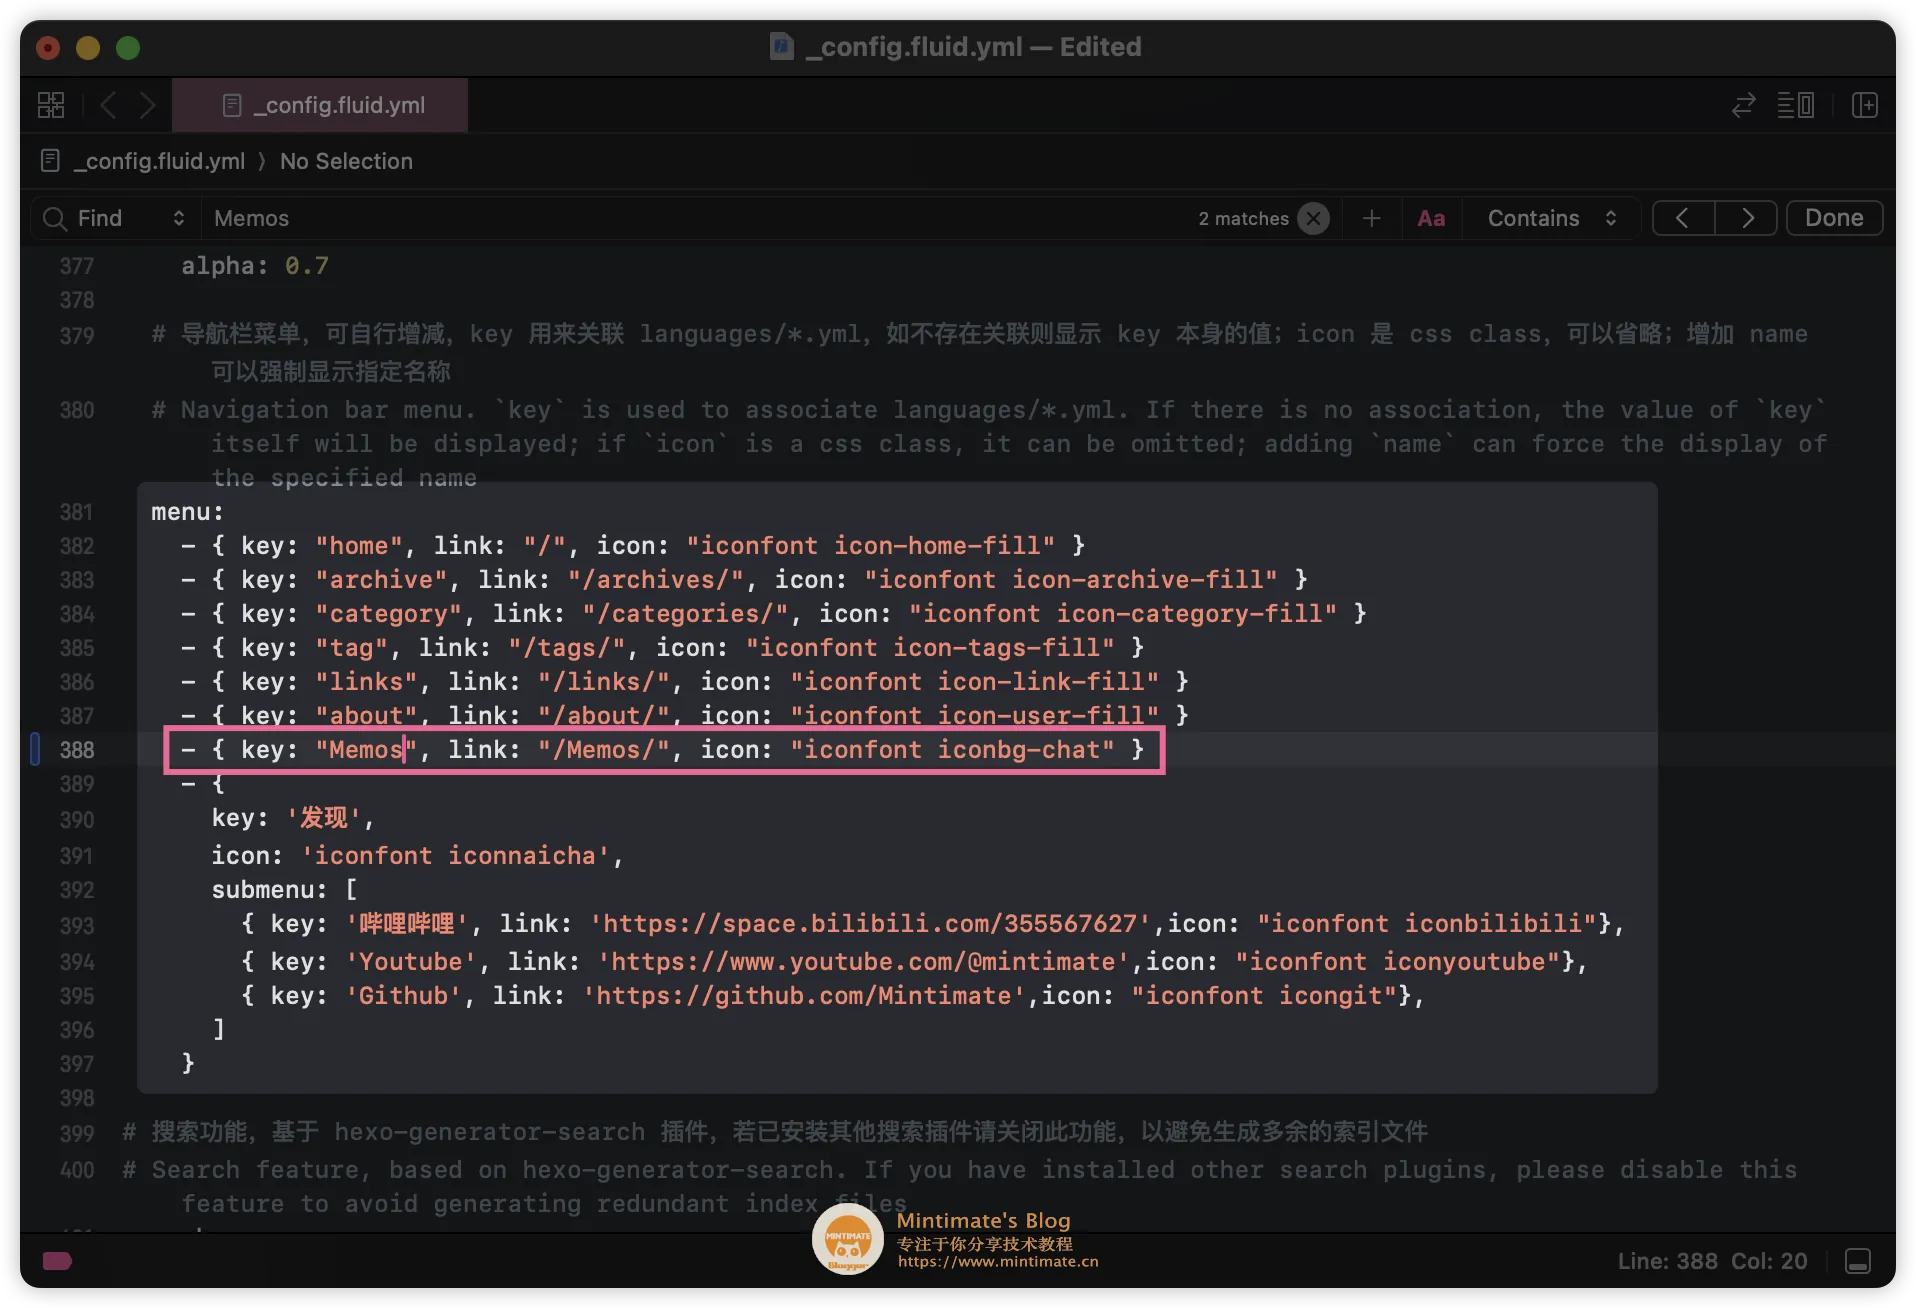
最后,你就可以在博客的 Memos 页面看到效果了:

END
好啦,感谢阅读,如果觉得不错,欢迎点赞、评论、转发。如果有什么问题,欢迎在评论区留言。
其实,如果你不想用 Memos 的 API 做数据源,那么单纯作为一个私有化的“朋友圈”,亦或者是自己的备忘录,那么也是非常不错的(尤其是不用考虑每次的接口破坏性变更)。

哈哈,有时候我也会那 Memos 发一些吐槽并设为仅自己可见。有时候,一些东西说出来,反而会好受一些,把 Memos 当作自己的情绪“垃圾桶🗑”。